01.11.2012 | 9:57 am
I got a letter a couple days ago. The subject line kind of caught my eye:
Fat Cyclist at the South Pole
Yeah, I decided to read it. Here’s what the author, Nate Cannon, had to say:
Fatty, I’ve been reading your site a while now and wasted many a working hours reading your race write ups, technical reviews, and general hilarious blogs.
I am currently 3 months into a 13 month stay at the Amundsen-Scott South Pole Station working for the US Antarctic program. Being that I was planning on being here a over year, and the thought of riding only spinning bikes makes me crazy, I bought a Pugsley fat tired bike before I came down.
And after years of regretting not buying a FC jersey, I picked up a full kit this summer, which I’ve really enjoyed. I finally got the time to have a friend come out to the South Pole with me and take the obligatory “hero” shots with my bike and rocking the FC jersey.
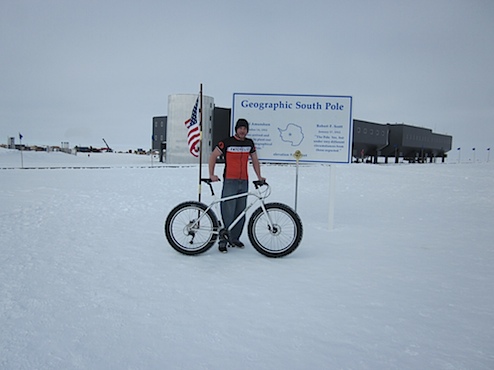
It was a nice relatively calm -14F, I’d taken a few rides that were well into the -20’s with wind chills reaching -40 and it’s hard to dress for that. I rock the bibs under 2 pairs of long johns and a pair of windproof pants, and it’s ok for a bit over an hour.
My friend taking pictures made me try to pop a wheelie, it was not a very good attempt.
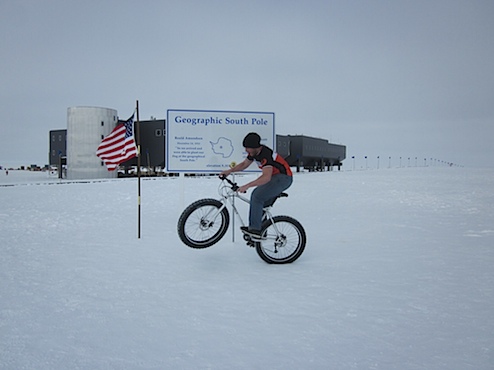
I thought you might enjoy the pictures, I’m going to try and ride the bike all year, but in a few months we will have 24 hours of darkness and temperatures dipping below -100F, so I’m not sure I’ll be getting outside too much.
The next time I think it’s too cold for me to get out on my bike, I’m going to think about Nate. And go ride.
PS: Nate says he’ll check back on the blog and try to answer questions left in the comments.
Comments (58)
01.10.2012 | 7:24 am
When I am mountain biking, I am — unfortunately — easily distracted from the task at hand. When I should be paying attention to the fifteen to fifty feet ahead of me (depending on visibility of what’s ahead as well as how technical the trail is), I will sometimes make the crucial and possibly unforgivable error of looking off to one side or another.
I will, instead of attending to the trail, look at the mountain. Or at a pretty tree. Or the sky. Or at animals and bugs.
Sometimes, I will completely lose my head, stop altogether, and start talking with the people on the ride.
I should know better. Eyes on the trail, man; feet on the pedals. Focus. Focus! This ain’t no time for jibber-jabber!
I can’t help myself. When I’m mountain biking, I want to look around.
Fortunately, I generally am much better-behaved when I ride my road bike. When I’m riding on the road, I pay attention to the thing I ought to be paying attention to.
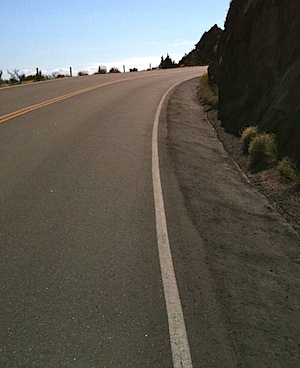 The white line.
What’s Strange
When I am off the road bike, I sometimes wonder what is so special about that white line. All it signifies, when I’m off the bike, is where the shoulder begins. When I’m in a car, for example, I will glance at it and think nothing more than, “I should probably not cross that line, since I don’t like the sounds of rumble strips, and The Hammer will think I’ve fallen asleep at the wheel again.”
And then I won’t think about it again until I fall asleep at the wheel (again).
Indeed, when I am not riding my road bike, hours and hours and hours might elapse with me giving the white line nary a thought. And I’ll bet that you’re no different. I’ll bet, in fact, that if you haven’t been out road riding today, you haven’t dwelt on the white line for more than 0.2 seconds (excluding, of course, the time you’ve been thinking about it while reading this post).
But if you have been riding today, I’ll bet you’ve spent a considerable amount of quality time with the white line. As in, I’ll bet you’ve spent more time looking at the white line than any other object today.
Which is, when you think about it, quite weird.
Now, don’t get your hackles up. I’m not saying you’re weird. No. I’m saying we’re weird, because I don’t even know how much time I’ve spent staring at that white line in my road-riding, cycling lifetime. I am, however, happy to make a number up out of thin air. Over fifteen years of riding, I’ll bet more than two thousand hours. Conservatively.
Yes, that’s right. Having made this number up, I’m now quite confident that I’ve spent more than two thousand hours staring at the white line painted on a road.
What’s Even Stranger
What’s even stranger than how much time I’ve spent staring at the white line, though, is what I’ve been staring at the white line instead of.
When, for example, last year Kenny, Heather, The Hammer and I relay raced from Moab to St. George — 500 miles in one day, across some of the most stunning desert landscape you could ever hope to take in — guess what my predominant memory of the course is?
The white line.
Or how about my most vivid memory of Mt. Nebo, my favorite local training century ride, due to the obscene amount of climbing, the staggering mountain vistas, and the intense paceline return trip?
The white line.
Or — and this hurts me to say it, because it’s pretty embarrassing — what about that trip-of-a-lifetime cycling vacation The Hammer and I took to France last summer? My very first biking trip in Europe?
Well, I saw a lot of beautiful things, that’s for sure. But when I was on the bike, I saw more white line than everything else put together.
If you want to blow the minds of a roomful of cyclists sometime, pose the question: “How much time, in the history of modern cycling, do you think the sum total of cyclists have spent staring at a white line?”
The number, I assure you, is staggering, and probably has “to the power of” in it somewhere.
The Strangest Thing of All
But you know what’s really, truly strange? This: I am not even a tiny bit ashamed or regretful of all that time I’ve spent staring at the white line.
Really. I’m not.
Because I think that staring at the white line is indicative of the biggest difference between road and mountain biking. And, in fact, it’s part of why I love road biking.
See, when you’re staring at the white line, your eyes are fully occupied. And since you’re on a road bike with your body performing a demanding-but-repetitive action, your body is fully occupied, too.
This leaves your mind free to wander a bit.
While staring at the white line, I’ve had my best blog post ideas just pop into my head (in fact, a good road ride is the one surefire way I can be guaranteed to come up with a usable post idea; ask The Hammer how many times I’ve said, while we’re riding together, “Hey, I just realized what I’m writing about tomorrow.”). I’ve resolved difficult work problems, without being aware that I was even thinking of them.
And, occasionally, while staring at the white line, I’ve experienced tranquility. I’ve been riding along, pedaling away, trying to turn less squarey circles, and then . . . something happens.
Or maybe it’s more honest to say something stops happening. Regardless, time (I don’t know how much) passes, and I become aware again. I’ve gone some distance, but I don’t really remember it. I don’t remember what I was thinking, but I do know I feel good. Peaceful. Happy.
And all I was doing was riding my bike and staring at the white line.
Comments (44)
01.9.2012 | 7:01 am
Beehive Nursing Home, Salt Lake City (Fat Cyclist Fake News Service) – The cycling world was rocked today when a sweeping, all-encompassing lawsuit was lodged against every cycling body in the world. Further, every single individual cyclist — both road and mountain, with the exception of dedicated single speeders — was also named in the the suit, making this the widest-ranging, most comprehensive, and freakishly thorough suits ever lodged.
Said Derek J Vanderwood, lead attorney for the plaintiffs, “Our clients have extensive resources, long memories, and — frankly — plenty of time to pursue this case.”
“Besides,” said Vanderwood, “I find it completely impossible to say ‘no’ to them.”
The Case
According to spokesperson Lisa “The Hammer” Nelson, a local grandmother and well-known hardcore cyclist who could basically kick your trash from here to Albuquerque, “We, the grandmothers of the world, are sick to death of the lowest gear on bicycles being called ‘the granny gear.’ We find the stereotype insulting, not to mention inaccurate.”
Continued the grandmother to one, “You think I got my nickname by using the small ring? Join me for a quick hundred-mile ride sometime, road or dirt. Flats or mountains. We’ll see who goes to the small ring first.”
Then, noting the averted eyes and apologetic mumbling of the assembled press corp, Nelson said, “Oh, I’m sorry, I didn’t mean to make you feel bad. Come here and let me give you a hug.”
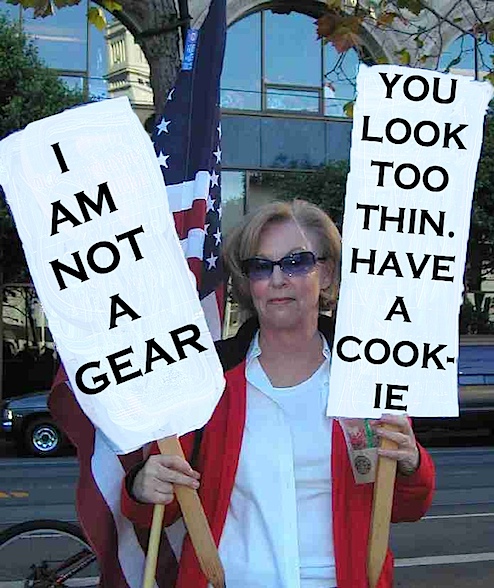
A grandmother protesting the usage of the term “granny gear,” as well as the general boniness of many cyclists.
Kellene Mortensen, grandmother and multiple-time finisher of the weeklong “Ride the Rockies” ride, famous for its grueling multi-mountain-pass stages, added, “I usually ride with women my age because the men can’t keep up. How about calling it the ‘grandpa gear?’”
Alternate Names Considered
Gary Holcombe, assistant attorney on the case, said that in addition to damages, the lawsuit against all agencies, companies and cyclists who have used — and especially those who continue to use — the term “granny gear,” will henceforth be required to use one of the following alternate terms:
- Easy gear
- Old man gear
- Gear formerly known as granny
“Or,” said Grandma Hammer, “you could give it an adorable pet name, like ‘The Fatty Gear.’”
Cycling Industry Responds
Cycling industry representatives were uncharacteristically available and willing to respond to this suit. “Let me be the first to apologize,” said Chuck Ibis. “I would never intentionally hurt a grandma’s feelings. I’ll never do it again, Grandma.”
“Also,” continued Ibis, “I really like those socks you knitted me for Christmas, and I wear them every single day.”
Added beloved and award-winning cycling blogger Elden ‘Fatty’ Nelson, “My mom’s a grandma like a million times over at this point. I would never hurt her feelings. Sorry, mom. I’ll never call say ‘granny gear’ again.”
“Oh,” continued Fatty, “And also The Hammer’s a grandma. Holy smokes, that cracks me up every time I say it.”
Fatty then began laughing convulsively for approximately ninety seconds, then tried his darnedest to put on a sober face and said, “Sorry, Lisa.”
Laird Knight, owner of the endurance race promotion company formerly known as “Granny Gear Productions,” best known for its 24 Hours of Moab event, likewise issued an apology. “For years, our signature race has been in decline. It has recently come to light that this is quite likely due to grandmothers across the United States offering oblique statements of disapproval of our name, saying things like, ‘Oh, are you really sure that doing that race is such a good idea?’”
“To all grandmothers, I offer my sincere apologies and the assurance that neither I nor anyone in my employ shall ever use the term ‘granny gear’ ever again. Now please, tell your grandkids it’s OK to come race again. I’m begging here.”
Upon hearing the virtual stampede of cycling luminaries falling over themselves to apologize and reingratiate themselves with their grandmothers, Margaret Abernathy, a grandmother and track cyclist from Ohio, responded on behalf of other grandmothers. “Oh, it’s fine, really,” said Abernathy. “Don’t make such a fuss.”
Concluded Abernathy, “Why don’t you all come over this weekend? I made applesauce.”
Comments (37)
01.6.2012 | 4:00 am
 Welcome to Part II of How to Patch a Tube (Part I is here). I am sure that you are as thrilled — and surprised — as I am to discover that this topic requires multiple entries.
In part I of How to Patch a Tube, you learned everything leading up to how to patch tubes, but not how to patch the tube itself. Which makes Part I quite possibly the longest-winded intro I have ever written, in the nearly-seven-year history of a blog known for extraordinarily long-winded, self-indulgent introductions.
But I promise, in today’s post you will learn everything you need to know (and much much more!) in order to patch a tube.
Step 3: Find the Leak
It’s time to put on your detective hat, because you need to find where the hole in the tube is. Now, the best way to do that is to pump the tube full of air and then submerge it in still water, watching for bubbles.
Because of this, it is very important that you always ride your bike near a large body of water. Or carry enough water and a large enough container to submerge a bike tube in.
If necessary, you may also demand other riders in the group give you their water.
Unfortunately, water can sometimes be scarce, due to some riders inconsiderately and shortsightedly drinking it.
That’s why, as a backup, when riding you should always carry a small container — no more than a quart will be necessary — full of dishwashing liquid. Simply pump the tube up, then quickly smear some dishwashing liquid on the part of the tube you think may be the culprit. If it is in fact the part of the tube that has a hole in it, the dishwashing soap will begin to bubble.
More likely, though, you will have been wrong, so it’s a good thing you brought plenty of that dishwashing liquid. Smear some more on another part of the tube. Then wait. Breathlessly. Watch the tube with fierce concentration, looking for any sign of bubbles.
Nope, that part of the tube seems fine too.
Well, obviously you’re never going to find the hole by smearing soap over a tiny bit at a time like this, so now’s a good time to pump the tube up full of air again, then go ahead and smear soap over the whole darn thing.
You should now find bubbles appearing at some point on the tube. Or, more likely, at between six and eleven points on the tube.
Go ahead and deflate the tube now that you’ve discovered where the hole (or holes) is (or are).
Now go get about six gallons of water to rinse all that soap off the tube. So hopefully you brought both a lot of water and dish soap.
Now go ahead and re-inflate and soap the darn tube, because you’ve almost certainly lost track of where the hole (holes) is (are).
This time, mark where the holes (even if there appeared to be only one hole at the beginning of this project, there is certainly a new hole by now).
Step 4: Repair the Leak
Congratulations, you’re now past the discovery period and are ready to apply the patches. Luckily for you, patch kits have advanced tremendously in the past few years, and are now extremely simple to apply, effective at sealing punctures, and reliable at keeping them sealed.
Just kidding.
Patch kits are actually exactly the same as they were when you had to fix a flat in order to get some kind of cub scout / brownie scout merit badge thirty years ago. In fact, patch kits are interesting primarily because they represent the single thing in the whole world that has not changed or advanced — in spite of huge advancments in both adhesive and material technologies — in the past eighty years. I mean, firewood has had more technological advancements than bike tube patch kits.
But hey, if it works, don’t fix it. Right?
So first, rough up the area around the hole, using the tiny little cheese grater that comes with the patch kit. I’m not sure why you’re supposed to do this, but you are. Be enthusiastic about your roughing, but not so enthusiastic that your rough your way clean through the tube.
Now, clean the area you’ll be applying the patch to. This shouldn’t too big of a problem, since you recently applied so much dishwashing liquid to the tube that it should be ready for the operating room.
Next, apply a small amount — you’re on your own for deciding what “small amount” means — of the patch glue to the tube. Keep some in reserve for sniffing later; you’re going to want something to help even your mood out.
Oh, sorry. As it turns out, that tube of rubber cement that came with the patch kit has been all dried out since 1968. Sorry! Well, I’m sure it wasn’t really very necessary anyway. Let’s continue as if everything’s going juuuuussst fine.
Or if, by some miracle, your patch glue isn’t all dried out in the first place, let the glue on the tube dry slightly, for just a minute. So it’s nice and tacky. The time window of rubber cement tackiness between “too wet” and “too dry” lasts approximately one-quarter second, so be ready with that patch.
Peel the backing off the patch. Hopefully, you have had the foresight to have grown long, bladelike fingernails during the past several months, or there is no way in God’s green earth that you are going to be able to peel that backing off.
Press and hold the patch in place firmly until you are sure it is set — approximately seven hours.
Congratulations, you’ve patched the tube! Now you need to get it back on the wheel.
Step 5: Put the Tube Back on the Wheel
It’s very easy to get the tube back onto the rim. Just stuff the sucker back in there. Although you’ll probably have better results if you take the trouble to at least push the valve stem through the hole in the rim.
What’s tricky is getting the tire bead back on the rim. Especially on mountain bikes. But with some patience, you can do it. Just carefully ease the bead onto the rim, working your way carefully around the circumference of the wheel.
After you’ve been around the wheel about five times, you’ll realize that as you put one part of the bead on the rim, another part is coming off. Maybe if you chase it faster, you’ll catch it.
Nope, I guess not.
So instead, use the tire lever to force the bead onto the rim, holding the part you’ve already got on the rim in place with your hand. If you do everything correctly, as you get to the end there should be just a little piece of tube poking out between the rim and the tire bead, with no easy way to get it into the tire. Push it in with a screwdriver or something. Then, with all your might, lever the final tiny bit of the bead over the lip of the rim.
You’ve done it!
Now pump up the tire and put the wheel back on the bike; you’re ready to go!
Ha ha! Just kidding! Still! Because of course the tire won’t hold air.
Step 6: Fix the Patch
You now need to take the tire off the rim again and pull out the tube. Then fish around in the tire until you find the patch, which will have peeled off the tube. Get another patch and repeat Steps 4 and 5. Again. Because they will certainly go better this time, now that you’ve had practice.
Try inflating the tire again. It won’t. Take the tube out again. That’s weird; the patch seems to have held this time. Better get out the soap and look for new problems.
Yep, there it is: the new hole from when you pinched the tube between the rim and the tire. You’re going to need a couple of patches to fix that.
Step 7: Fix the Problem
Finally, you’ve done it! You’ve patched the old holes, as well as the new holes! You’re all set to ride again! Huzzah!
You should be able to ride for roughly two minutes before your tire goes flat again. Repeat all steps, except this time be confused when you discover a brand new hole in the tube.
Oh. Waitasec. Maybe it would have been a good idea to feel along the inside of the tire, to see if there’s something sharp stuck in there.
After rubbing your fingers along in the tube for a minute or two, you should discover the sharp thorn / piece of glass / rattlesnake fang protruding through the tire. The thing that caused the flat in the first place. And by “discover,” I of course mean, “discover by the means of that sharp object puncturing and lodging itself in your thumb.
Now you just need to work that out of the tire, which should be no problem if you happened to bring a set of extra-pointy needle-nose pliers as part of your tube-repair kit. Otherwise, you’re going to get to discover exactly what the inside of a tire tastes like as you try to bite and pull the offending sharp object out using your front teeth.
Then, go through Steps 4 – 6 as many times as necessary. Which, I regret to inform you, is probably more times than you have patches
Then get a new tube out and use that instead.
Comments (41)
01.5.2012 | 5:15 am
As you are no doubt aware, bikes are cool. Through some weird magic some like to call “physics,” bikes can make you go faster than you otherwise could go, while expending less energy than you otherwise would expend. Meanwhile, you’re having fun while exercising, which is even more magical than the whole further-faster-easier mindbender.
And bikes look great, too. Especially my bikes.
The thing is, though, bikes are not perfect. I mean, consider the number of moving parts. No, on second thought, don’t consider the number of moving parts, because the number is far to great. Especially when you consider the number of moving parts in a bike chain alone. We’re talking about ten moving parts per inch.
The mind boggles.
There are cables and derailleurs and spokes. And hubs. And pedals. And handlebars. and shifters and brakes.
Oh my.
But really, you shouldn’t worry about any of those things. Why? Because if any of those things break in the middle of the ride, nobody really expects you to be able to fix them and then continue on your way. (Except maybe the chain, and even that’s a kinda-sorta thing).
But if you get a flat tire during your ride, the folks you are riding with are going to expect you to repair the flat and continue on.
Luckily for you, I am an expert not only at riding bicycles, but at repairing them as well. So today, I shall teach you how to patch a bike tire.
Step 0: Get the Futile Attempt Out of the Way First
Of course, before you try to patch a tube, you should try to pump it back up. Just to see if that leak is a one-time thing. Because hey, why wouldn’t it be? Maybe the tube was just playing a little prank there for a few moments, and now it’s going to reliably hold air.
It could happen.
Step 0.5: Look Around Hopefully
Once you have verified that the flat you’ve got is in fact not one of those rare-but-awesome self-healing ones, you’re all set to begin the work of repairing your tube.
Unless, of course, you can get someone else to do it for you.
Now, most people won’t automatically volunteer to fix a flat for you; as it turns out, most people are every bit as incompetent as you. However, if you fumble around long enough and badly enough, there’s an excellent chance someone you’re riding with will get so exasperated that they will finally offer to fix your flat for you.
In order to make this happen, the first thing you should do is ask to borrow a wrench (unless you have a bike that requires a wrench to remove the wheel, in which case ask for a handsaw). Be as unspecific about which kind of wrench as possible. When asked why you would want a wrench, say, “So I can remove the saddle, so it won’t get dirty when I turn the bike upside down.”
Then say, “I think I’m going to need a chain breaker, too.”
Finally, shrug your shoulders and confess, “Honestly, guys, I’ve never done this before. In fact, I’m a little bit shocked to learn that these tires are full of air. I always imagined they were solid rubber or something.”
I would put your chances at someone pushing you aside and getting to work at approximately 84%. Which is pretty good odds, really.
Step 1: Remove the Wheel
OK, suppose the “get someone else to do it” gambit didn’t work, either because you’re a poor actor, or you’re riding alone. For whatever reason, you’re going to have to patch the tube yourself.
There is nothing quite so disheartening when one is riding a bicycle as the discovery of a flat tire. Actually, that’s not entirely correct. It’s even more disheartening to discover one’s femur poking out throught one’s skin.
But a flat tire is still pretty darn bad.
So, after coasting to a stop — it’s very important to not try to change the tire until you have come to a complete stop — you need to remove the tire from the wheel.
Which means you first must remove the wheel from the bike. And don’t go thinking you can skip this step, because you’ll look foolish if you do. Trust me, I know.
If it’s the front tire that’s gone flat, you’re in luck. Well, not really in luck, because if you were really in luck you wouldn’t have gotten a flat in the first place. But you’re at least not in as bad of luck as if you had gotten a flat tire in the back. A flat in the back adds a whole extra layer of suck frosting to the cake of suck that you’re already going to have to eat.
So anyway, if it’s a front flat, you just pull down the quick release lever, and pop the wheel off.
But if it’s a rear flat, well, you may first want to shift all the way to the smallest ring on your cassette — this will make things easier when (and, let’s face it, if) you eventually get the repaired wheel back on the bike. Then drop the chain off the front chainring, to give you a little extra play with the chain.
Now loosen the quick release (if you’re using bolts instead of quick releases, well, you’re on your own), pull back the rear derailleur, and pull the rear wheel out of the labyrinthine mess that is your bike chain path.
Now take a good look at the path of the chain and take a moment to consider the fact that you aren’t really exactly sure where in that tangle of metal you’re supposed to put the wheel back when (if) you get the flat fixed.
Oh well, nothing you can do about it now. May as well get to removing the tire.
Step 2: Remove the Tire
Congratulations, you’ve made it to the easiest part of the process: removing the tire and tube. Here, just insert a tire lever between the rim and the tire, then force it under the bead of the tire. Kind of like you would with a coat hanger between a car door sill and window when you lock your keys in the car. For really old cars I mean.
Once you’ve got the lever under the tire bead, pry it up and over the rim. Then run the lever around the circumference of the rim, easily bringing the bead of the tire off the rim.
Now grasp the tube — because it suits our purposes to pretend that everyone still uses tires with tubes, even though that’s a really terrible idea — and pull it off the wheel.
There, that wasn’t so hard, was it? And the good news is that actually getting that tire bead back onto the rim is only 10,000,000,000.9 times more difficult.
And you will learn how to do that (and much much more!) in Part II of How to Patch a Tube.
Comments (39)
« Previous Page — « Previous Entries Next Entries » — Next Page »
